| Author: | George F.Crew |
THIS ARTICLE WILL HELP YOU:
- QA Tools in Convert
- Chrome Debugger Extension
- Preview Variations URL
- Forced Variation URLs
- Use of query parameters in "QA Test" Audiences
- QA Stages in Convert
- 1st Stage - Visual Editor and Preview Variation URLs
- 2nd Stage - Preview with Force Variation URLs
- 3rd Stage - QA the whole setup while viewing the experiment report
- 4th and Final Stage - You're Ready!
QA Tools in Convert
Any company introducing experimentation into their digital marketing strategy should incorporate QA measures into their operational workflows, such as certifying integrations and previewing experiences before going live.
At Convert, we integrate the many pieces of a puzzle to create a personalized strategy in the simplest possible way. We’ve helped hundreds of businesses improve their ability to build, test, review, and launch experiences with our diverse tools and resources.
Let us show you what they are and how they can be a well-rounded solution to all your QA problems.
Tips
X-Frames Extension may be Required for Working in Visual Editor
If you see a blue "proxy message" bar in Visual Editor, please see this article.
Chrome QA Widget
This is the primary tool you should utilize for quality assurance (QA). It enables you to view experiment changes and identify which experiment and variant you are assigned to when loading a web page. Additionally, it displays the goals and experiments that have been activated on the current page. For detailed guidance, you can refer to the documentation provided in this article.
Note:
The QA Overlay is supported on the current tracking script. It is not available when using the legacy snippet. If your site runs the legacy snippet, update to the current script to use the QA Overlay—mobile QA works well with the overlay when the current script is installed.
Chrome Debugger Extension
This tool outputs the logs of the Convert script to the Chrome developer tools console.
The output includes experiments triggered, specific variations triggered, and allows you to determine the sequence of events in regards to testing. This provides a lot of useful information when debugging a test.
This tool should be used throughout the whole QA process to determine if you are bucketed into the experiment and determine the variation that you are seeing.
You can find more information on how to install it in this article.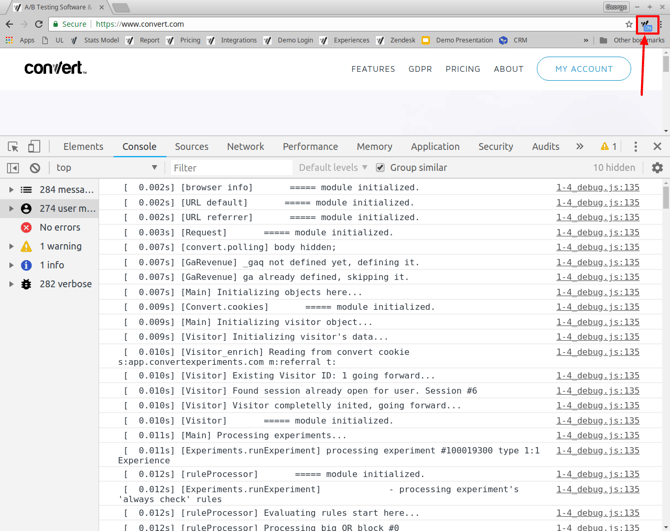
It is very common to be bucketed on the original variation and assume mistakenly that the experiment is not working. This is why we recommend that you enable the extension in incognito sessions and perform the QA there.
All variation and experiment references in the debugger output are made with the corresponding IDs. You can find out how to determine IDs in this article.
Consent matters for QA:
If your site uses a CMP (Cookiebot, CookieConsent.io, etc.), cookies may not be set until you grant consent. For reliable bucketing during QA, ensure consent is provided or temporarily allow the Convert tag for QA testers. Read more here: Integrate with Cookie Consent Management Platforms (Cookiebot), CookieConsent.io Integration, Convert Consent Capabilities
Preview Variations URL
These URLs are meant to be an aid while developing/drafting an experience using the Visual Editor. While working, the experiment QA tester should go back and forth between these URLs and the Visual Editor view. The Visual Editor view may not be completely accurate since the window in which the editing occurs is done in a frame. Also, the code that makes changes in the editor runs repeatedly for ease of use. 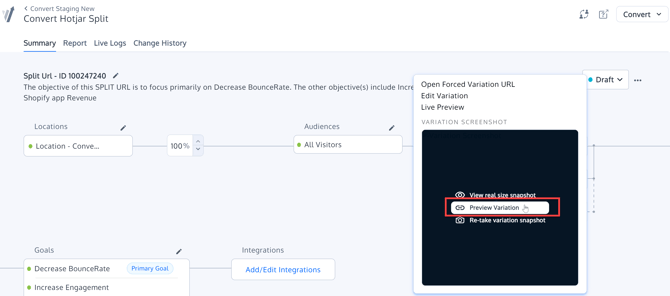
There are some considerations to take into account:
-
The experiment conditions from the Site Area and the Audience are not taken into account when doing a preview with the Live Preview URL. The changes are made to the page URL on which you append the parameters. This is for making it easy to test different views.
-
You can find these URLs automatically generated for you in the Visual Editor > Variation Menu > Live Preview, and in the report alongside the Original and each Variation (look for the eyeball icon as shown in the screenshot above).
Forced Variation URLs
The purpose of Force Variation URLs is for you to test your experiment in the closest environment to what a visitor will experience. These URLs should be used to do the final testing of your experiment. These links will only work when the experiment is active.
Forced Variation URLs will only work on active experiments, and not on Draft ones.
Variations served with this URL are served from the same CDN server we use to serve the experiments. ![]()
When using a Force Variation URL, the experiment conditions will also be evaluated, so make sure that they are matched. If you are using a QA audience, you could complement the Force Variation URL with the QA audience parameters, like:
https://www.convert.com/?_conv_eforce=1001173467.100121503&utm_medium=qa
Also, when using a Force Variation URL and testing goals, take into account that goal configurations often include URL conditions. If your goals do not trigger when using a Force Variation URL this might be why.
You will find more information on how to format them in this article.
Tip for cookie-limited QA (Safari Private / strict modes):
Force Variation URLs evaluate Audience conditions at load time. If a reload or navigation drops your QA query string, start a new private/incognito window and hit the Force Variation URL again with your QA parameter to re-bucket.
If you’re using the legacy snippet, the QA Overlay is unavailable—use Force Variation URLs + QA audience or the alternatives below.
Sources: QA Overlay Widget User Guide
Use of query parameters in "QA Test" Audiences
You can restrict the visitors that will see your experiment by adding a QA audience to the experiment. You will be able to be bucketed to the audience to see the experiment by adding the QA query parameters to the experiment URL like https://www.domain.com/mypage.html?utm_medium=qa.
Safari iOS/iPadOS Private Browsing & cookie-restricted contexts
In environments where cookies are not written (e.g., Safari Private, some Incognito sessions without consent), the utm_medium=qa parameter won’t persist after a full page reload or a navigation that strips the query string. If the page reloads (e.g., a “Request a callback” flow), your QA bucketing can be lost and the experience may not execute.
Start each QA pass from a fresh private/incognito window and include the QA parameter on the very first URL you hit after every full page reload. Consider the alternatives in “When UTM-based QA breaks on reload.”
Create a New Audience, with a condition like:
Medium matches exactly qa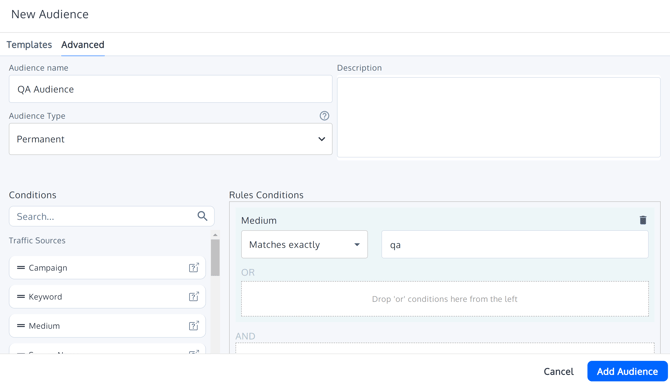
The purpose of a special audience is to allow you to Activate a test and verify it without allowing any visitors to be bucketed into it.
First, attach this audience to your experiment.
Before visiting the site, add the following to the end of your URL:
?utm_medium=qa (replace qa with the value you chose when you created the Audience).
Most of the time you would visit the URL that matches the locations conditions. Depending on how your experiment is structured, in some cases you may start out by visiting a different page and then navigate to the location that triggers the experiment to run. In either case, make sure you add the query parameter to the very first URL you visit. This parameter will be remembered even if you navigate to different pages.
For example, if the URL is http://www.mysite.com, you should visit the URL:
http://www.mysite.com?utm_medium=qa
If you follow the above instructions, you will be shown any variation in the experiment, as this is selected randomly.
After you have done the above, and if you didn't already start with the URL that matches the Site Area conditions, you can then visit the URL that matches the Site Area. You should then be viewing either the Original or one of the Variations, depending on which is randomly selected by the experiment.
Also, be aware that adding a special audience might affect your ability to match the Site Area and goal URL conditions. You would have to take this into account.
When UTM-based QA breaks on reload
-
Temporary cookie audience for QA: Use a tiny Convert experience (or site code) to set a QA cookie, then target your experiment to that cookie for mobile QA—avoid relying on UTMs that can be stripped on reload.
Prefer cookie-based targeting or Advanced Page Tagging (set a custom_conv_*tag and target it). - Geo/location-based QA with VPN: Temporarily target a city/region and connect via VPN to re-bucket on each load without UTMs.
- Re-apply the QA param after any full reload: If a site action triggers a full reload and strips the query string, begin a new private/incognito session and start again with the QA param on the first hit.
- Preserving query strings (Split URL tips): If your site strips UTMs during QA navigation, prefer cookie/tag audiences over UTMs—or ensure internal redirects preserve query strings.
QA Stages in Convert
These stages should be performed in each of the type devices that you plan to target such as desktop and mobile, to ensure experiment bucketing, display of changes, and goal tracking.
1st Stage - Visual Editor and Preview Variation URLs
Tools used:
- Preview Variations URLs
Goal:
To validate (to a certain degree of accuracy) that the changes created by the Visual Editor look good in a normal browser window.
Process:
- Develop your test using the Visual Editor.
- Preview each variation change with the Preview URLs provided in either the Visual Editor or on the Reports page. Previews open in a new tab.
- Make changes in the Visual Editor, then preview; repeat until your variation changes look the way you want them.
2nd Stage - Preview with Force Variation URLs
Tools Used:
- Force Variation URLs
- Incognito Window
- Chrome Debugger Extension (the extension needs to be enabled in Incognito)
- Query parameter Audience (eg, special qa_test audience defined by you)
Goal: To validate how a specific variation looks when served from Convert CDN servers and test your experiment Site Area and Audience conditions, but restrict it to your QA audience.
Process:
- Complete your experiment configuration, including the Site Area and Audience conditions.
- Set a QA audience in your experiment.
- Open a fresh Incognito browser window (only one instance should be open at a time as they share cookies between them -- this will affect your results if you have more than one incognito window or tab open or forget to close the incognito window after a test).
- Trigger each of the variations with “Force Variation URLs” (original is not necessary). Close and open another incognito session when testing each variation. Make sure you append the query parameter that you defined in your qa_test Audience to the end of your Force Variation URL (ie, something like ”&utm_medium=qa_test”).
- If you see that the forced variation is not showing what you expect, open the Chrome Debugger Extension, and go through the logs to see if the experiment conditions are met. You can search the log with the specific experiment ID to aid in your search.
- Fix any experiment issues if encountered. Repeat the testing process until the experiment and changes show correctly. If problems are found, please contact Convert Support.
Tip for cookie-limited QA:
If a reload/navigation drops your QA param (common in Safari Private), re-open a fresh private window and use the Force Variation URL with your QA param again.
3rd Stage - QA the whole setup while viewing the experiment report
Tools Used:
- Force Variation URLs
- Incognito Window
- Chrome Debugger Extension (enabled on the incognito window)
- Query parameter Audience
- Experiment Report
Goal: Validate that the entire experiment works as expected.
Process:
- Open your experiment report.
- Open an incognito browser window and the page of the experiment including the QA audience parameter.
- Use this if you don't want visitors to see the experiment yet -- additionally, if you have visitors increasing the numbers on your report, it's impossible to tell if the numbers that appear on the report are from your own visit and conversion, or your visitors' visits and conversions.
- If your experiment was Activated in the past without a QA audience, previously bucketed visitors might trigger conversions even if you set a QA audience later. The reason for this is that once a visitor is bucketed into an experiment (and has not yet triggered all goals) when they return we do not check to see if they match the audience conditions).
- Note the variation you see. Check if your visit to that variation is shown on the report (visitor count will be incremented by one, usually within a couple of seconds). Trigger your goals and check that your conversions are counted on the report. Verify that the variation is functioning and visually showing what you expect. Also, remember that visitors and goals are unique - you cannot trigger them again unless you close and open a brand-new incognito window.
- Close and reopen the incognito window. Repeat the process until all variations and goals are validated.
- Use Chrome debugger to aid you in identifying and fixing any issues encountered.
- If problems are found, please contact Convert Support.
Troubleshooting if you see control after seeing a variation:
-
Confirm the page didn’t reload in a way that stripped your QA parameter.
-
Start a new private/incognito window and begin with the QA param on the first hit.
-
If a CMP is installed, grant consent first (or enable your QA consent flow).
-
Consider a temporary cookie-based QA audience or geo-targeting for mobile QA.
4th and Final Stage - You're Ready!
Remove QA Audience and Reset Experiment
Once you have finished all of the above, remove your special QA Test Audience to allow your visitors to trigger the experiment. You can also use "Reset Experiment" on the Reports page under Advanced Settings. This will reset the start date of the experiment, as well as clear the previous visitor numbers and previous conversions to 0 on the report.
Once again, keep in mind that the Site Area and Goals might refer to specific URLs that might be matched with your special audience query parameter, but not without it, so check carefully.
Clone Experiment, Double-Check Configuration, and Activate
Important
Note that if you had your experiment Active at any point without a special audience to restrict visitors, and you use "Reset Experiment", it does not remove cookies from visitors' browsers. If they return we will recognize them as previously bucketed into the experiment. In that case, you could find a conversion with no additional visitor on the report (if the visitor was bucketed prior to resetting the experiment and did not trigger all conversions). An option to avoid this is to Clone your experiment and Activate the cloned one instead - if doing this, double-check your experiment configuration on the Cloned experiment!