- Help Center
- Integrations
-
Getting Started
-
Configuration
- Targeting
- Split URL
- Product Testing
- Full Stack
- Experiment Management
- CSP Configuration
- Experiment Execution
- Reports
- Exit Popups
- GTM Integration
- Troubleshooting
- Performance Optimization
- Event-Triggered Changes
- Holdout Groups
- Split URL Pages
- URL Parameters
- DataLayer
- Menu Configurations
- Traffic Exclusion
- Experiment Scheduling
- Dynamic Element Changes
- Price Targeting
- Experience Scheduling
- Privacy
- Hash Changes
- Async Tracking
- Selective Installation
- CSS Selectors
- Vue.js Integration
- Page Content
- Multipage Split URL
- Organic Traffic
- Visual Editor
- Server-Side Testing
- Traffic Bucketing
- GDPR Warnings
- Statistical Confidence
- Browser Privacy
- Query Parameters
- Embedded Videos
- Tracking Code Execution
- Simultaneous Experiments
- Tags
- Deployments
- Disable Testing
- Locations
- Programmatic Bucketting
- Query Parameter Handling
- Convert Library
- Variation Previews
- Experiment Editing
- Opt-Out Script
- Data Reset
- Body Hiding
- Visit-Specific Variations
- Variation Styling
- Preview Issues
- Variation Editing
- Full-Site Testing
- Blinking Variations
- Cross-Domain Cookies
- Regex Support
- Conversion Tracking
- SPA Testing
- Project Setup
- Cross-Domain Tracking
- Geo-Targeting
- Analytics Tools
- Campaign Tags
- Previewing
- IDs
- Query String Targeting
- Bounce Rate Goals
- Bot Filtering
- Query String Variables
- Custom Audiences
- Redirects
- Baseline
- Tracking Code Location
- Secure Cookies
- AngularJS
- Cloudflare
- Code Installation
-
Track Goals
- Form Tracking
- Cookie Management
- iFrame Click Tracking
- Performance Optimization
- Revenue Tracking
- Interaction Goals
- Form Submissions
- Advanced Goals
- Lazy Loading
- Multi-Conversions
- URL Parameters
- Bounce Rate Goals
- DataLayer Integration
- Scroll Depth
- Social Interactions
- Page Views
- Marketo Forms
- Feature Analysis
- AJAX Forms
- Revenue Tracking via GTM
- Order Outliers
- Cumulative Revenue
- Goal Templates
- Adding Revenue Goals
- JS-Based Goals
- Goal Basics
- Google Analytics Goals
- Social Sharing
- Dynamic Goals
- Typeform Integration
-
Target Visitors
- Geolocation
- Interaction Goals
- Goal-Based Targeting
- Weather Targeting
- Cookie-Based Targeting
- Page Visits
- Audience Management
- Audience Segmentation
- Experiment Targeting
- Advanced Audience Creation
- Audience Templates
- Audience Creation
- Data Layer Integration
- Manual Activation
- JavaScript Conditions
- Device Targeting
- Language Targeting
- IP-Based Exclusion
- Visitor Management
- Page Tagging
- Cookies
-
Troubleshooting
- Google Warnings
- Visual Editor
- HTTPS Content
- Logs
- Support Options
- Bootstrap
- Cookie Blocking
- Change History
- Mobile Debugging
- AdWords
- Bot Exclusion
- Domain Issues
- Cloudflare Issues
- Monitoring
- Cloaking Penalties
- Goal Editor Issues
- Variations
- Snippet Performance
- Changes Not Saved
- Blocked Visual Editor
- Goal Testing
- Visual Editor Browsing
- Experiment Issues
- Installation Verification
- Data Leak Prevention
- Usage Limits
- Experiment Previews
- GA4 Revenue
- Chrome Debugger Logs
- SPA Errors
- Checkout JSON Error
-
Analyze Results
-
Integrations
- Google Analytics
- Cookie Consent Platforms
- Microsoft Clarity
- Plausible
- Marketo
- HubSpot
- Tealium
- Smartlook
- Klaviyo
- Salesforce CRM
- FullStory
- Snowplow Analytics
- Webflow
- GA4 Roles
- Amplitude
- Segment
- React
- BigCommerce
- WooCommerce
- Active Campaign
- Google Tag Manager
- Mixpanel
- Zapier
- Inspectlet
- Crazy Egg
- LanderApp
- Unbounce
- Instapage
- Drupal
- PrestaShop
- Magento
- Roistat
- Piano Analytics
- Heap Analytics
- Kissmetrics
- Mouseflow
- Adobe Analytics
- Clicky
-
Account Management
-
Developers
-
What's New
-
Common Questions
-
Shopify
Integrate Convert Experiences with mParticle
THIS ARTICLE WILL HELP YOU:
- Convert-mParticle Integration
- Add Tracking Code Snippets
- Send Custom Events
- View Convert Data in mParticle
Convert-mParticle Integration
Integration of mParticle with Convert Experiences makes it simple for marketers and product managers to leverage user behavior data from web applications and sites to create personalized digital experiences based on data insights.
For each experiment, the integration can pass along the experiment name/id and variation name/id that the visitor is currently bucketed into.
Add Tracking Code Snippets
First make sure the Convert tracking code is installed on your page.
On every page that you want to install mParticle, paste the javascript SDK as described here.
Send Custom Events
You should then create the custom events you want to send (e.g. Convert Experiment Name and Convert Variation Name that the website visitor is bucketed into) by using the logEvent method. The logEvent method allows you to record any actions your customers perform. Each action is known as an event and corresponds to an event type. You can send a custom event from anywhere in the page where Convert experiences are running.
Example code for sending Experiment Name and Variation Name:
var refObject = window['convert']['data']['experiments']
for (var key in window["convert"]["currentData"]["experiments"]) {
if (!window["convert"]["currentData"]["experiments"].hasOwnProperty(key)) {
continue;
}}
var currentExperiment = window["convert"]["currentData"]["experiments"][key];
var curExperimentName = refObject[key] && refObject[key].n ? refObject[key].n : "unknown experiment name";
curExperimentName = curExperimentName.replace("Test #", "Test ");
var curVariant = currentExperiment['variation_name'] ? currentExperiment['variation_name'] : "unknown variant";
curVariant = curVariant.replace("Var #", "Variation ");
mParticle.logEvent(
'Convert',
mParticle.EventType.Navigation,
{'Experiment ID':'curExperimentName','Variation ID':'curVariant'}
);
View Convert Data in mParticle
Track events can be found in the Event Types tab in Admin Settings. Click view next to an event type to see all of the corresponding events.
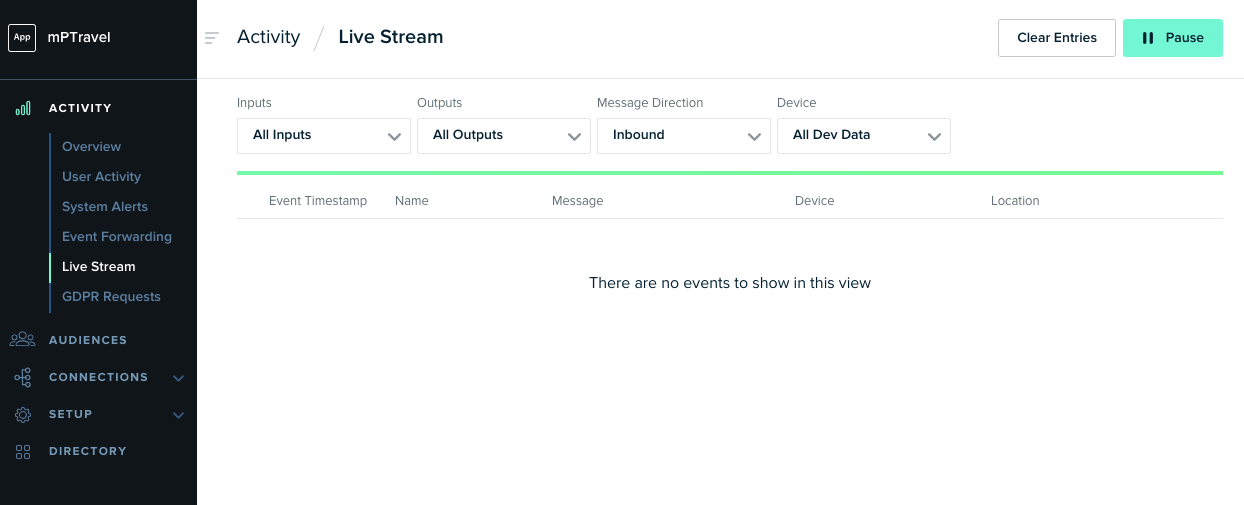
Navigate to Activity > Live Stream in the left column. The Live Stream lets you inspect all incoming data from your environments. It’s an easy way to check that you have correctly initialized mParticle integration.