
THIS ARTICLE WILL HELP YOU:
- Convert-Magento Integration
- Add Tracking Code Snippet
- RequireJS / AMD Compatibility
- Refresh Cache
- Add Magento website in Active Websites
- Create your A/B Experience
- View Report
Convert-Magento Integration
Magento 2 is an improved version of the previous Magento with new features, developer tools, and a robust architecture.
Integrating Convert Experiences with your Magento 2 website allows you to A/B test the website by simply adding the Convert tracking code through the Magento admin panel.
Magento 2 uses RequireJS as its JavaScript module loader, so Magento storefronts should be treated as RequireJS/AMD environments where the global define function and define.amd may be present. The Convert tracking script itself is AMD-neutral: it does not register or consume AMD modules. However, libraries added separately through project or variation code can still interact with RequireJS, so follow the RequireJS guidance below when adding third-party JavaScript.
For this implementation we used the demo Magento website that is available here: https://www.ubertheme.com/magento-news/magento-2-demo-sample-data-admin-access/
Add Tracking Code Snippet
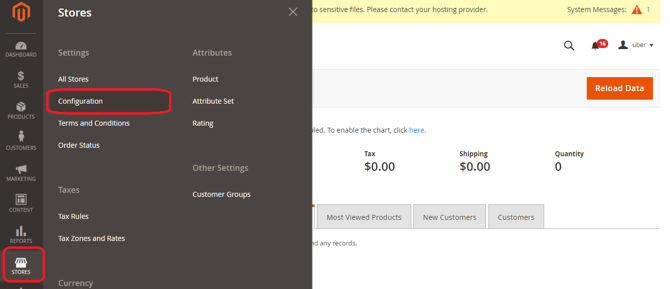
To add the Convert tracking code to your Magento 2 website, sign in to the admin panel then select Stores > Configuration.
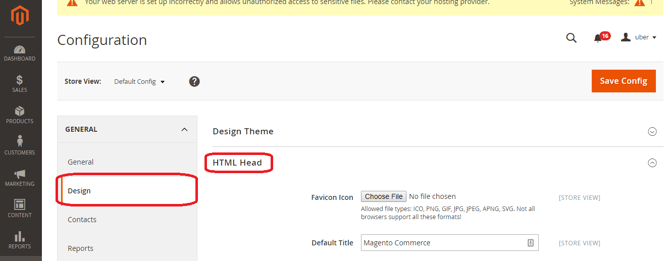
On the Configuration page, select the Design tab and click HTML Head section.
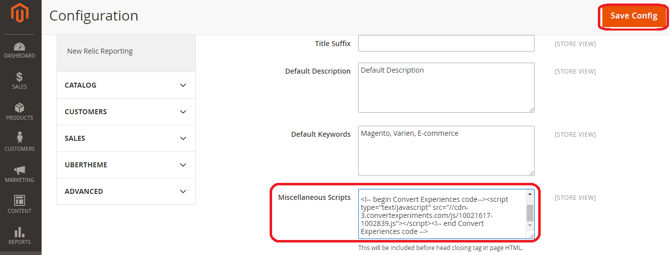
In the Miscellaneous Scripts text box, paste your Convert tracking code and then click Save Config.
For Magento 2 / RequireJS storefronts using the Latest tracking script, also go to Convert's Project Configuration > More Settings and make sure Do not include jQuery (for Latest tracking script) is enabled. This prevents Convert from loading an additional copy of jQuery on the storefront.
There is a separate, similarly named setting called Do not include jQuery (for Legacy Tracking script). That setting applies only to the Legacy tracking script. If your project uses the Latest tracking script, check the Latest row rather than the Legacy row.
RequireJS / AMD Compatibility
Magento 2 storefronts use RequireJS, an AMD (Asynchronous Module Definition) loader. This matters when custom variation or project JavaScript loads third-party libraries. Some libraries use a UMD wrapper that detects define.amd and automatically takes an AMD branch. If such a library is loaded as an ordinary script rather than as a RequireJS-managed module, it can interfere with modules already being loaded by the storefront.
When creating variations on Magento 2:
- Avoid including third-party libraries that automatically take a UMD/AMD branch when
define.amdis present. - If a library must be included, use a build with its AMD branch removed or disabled, or isolate its execution so that the library does not see the page's AMD loader. Do not accomplish this by temporarily changing the global
window.define. - Pay particular attention to libraries bundled directly into Custom JavaScript, Global Project JavaScript, or loaded dynamically from those locations. Review how those libraries behave when RequireJS is present before launching the experience.
Do not temporarily set window.define to undefined while loading an asynchronous script. For example, avoid patterns like this:
var originalDefine = window.define;
window.define = undefined;

var script = document.createElement("script");
script.src = "https://example.com/library.js";

script.onload = script.onerror = function () {
    window.define = originalDefine;
};

document.head.appendChild(script);
This creates a period while the external script is loading in which RequireJS's global define function is unavailable. Any Magento module that finishes loading during that period can fail to register. Because jQuery and jQuery-dependent modules commonly load early in a Magento page, the resulting errors may appear to be jQuery failures even though the underlying problem is the temporary removal of window.define.
Instead, use an AMD-safe build of the library, remove or disable its AMD/UMD registration branch before deployment, or load it through an integration approach that does not modify Magento's global RequireJS environment.
Refresh Cache
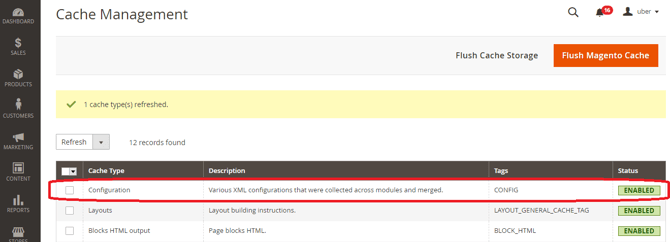
You might see a message: "One or more of the Cache Types are invalidated: Configuration. Please go to Cache Management and refresh cache types". Go to Cache Management:
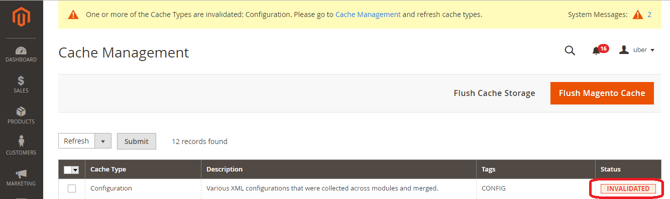
Select Configuration from the list and hit the Refresh Submit. Configuration then will be enabled:
Add Magento website in Active Websites
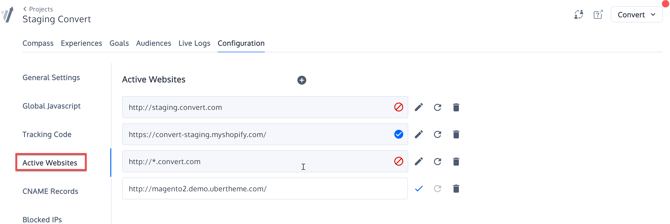
Go to Project Configuration to add your Magento URL to the active websites (in our case we added the demo frontend URL: http://magento2.demo.ubertheme.com/
Create your A/B Experience
Create an A/B experience as described here.
View Report
After the experience has been created, you will be able to view data into your report, as website visitors are bucketed to original or to variation.