How to Install the Main Tag / Convert Tracking Code / JavaScript
📄 How to Install and Optimize the Convert Tracking Code for Best Performance
⚠️ Legacy Tracking Script Deprecation
The Legacy Tracking Script is deprecated. We will begin automatic migrations on February 1, 2026. Please switch to the New Tracking Script for best performance and ongoing support. See “New Script vs Legacy (Deprecated)” below for benefits and steps. (Auto-migration will move eligible projects to the new script without code changes, but we strongly recommend updating your snippet proactively.)
🚀 THIS ARTICLE WILL HELP YOU:
🔹 Where to Install the main Convert Tracking Code
The main Convert tracking code needs to be installed in the <head> section of the page, before any other loaded resource. Placing it after the <title> tag is best.

It’s not an absolute requirement to install the code just after the <title> tag, but doing it this way ensures the best performance. The reason for this is that the Convert Experiments tracking request needs to be initiated as soon as possible on the page, giving it time to get the results back before the whole page finishes loading.
Convert experiments can run even if the code is installed on the footer of the web page. However, in that case, since the tracking request will be started just before the page has loaded, the variation changes arrive later in the browser. Therefore, there will be a greater amount of time to wait before the variation is visible. This can cause a distracting visual blink of the original page before the variation is seen.
🔹 Where to Find your Convert Tracking Code
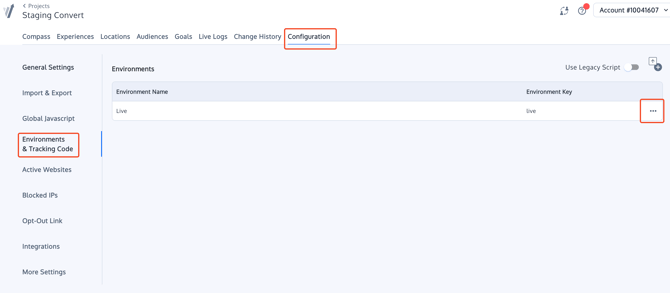
The main tracking code can be found on the Project Configuration. To find it, select your Project from the Project Panel:

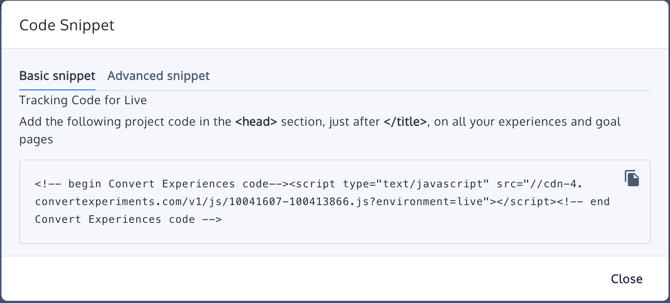
Once you have selected your Project, on the top tabs select Configuration. Go to Environments & Tracking Code, select the environment you need the tracking code for and click on the meetball menu. Click on "Install Code Snippet, you will then find the tracking code snippet. 


Copy and paste the code and place it on your website as described in the previous section.
🔹 Basic or Advanced Snippet?
You should install the Basic Snippet, unless you are going to use Page Tags data to target, track, or segment in Convert. Page Tags are used to transferring data from your backend being your CMS, CRM, Ecommerce Engine to Convert, or any other system that may provide your data to be used within Convert.
🔹 The Tracking Script vs Legacy Tracking Script
The new tracking script is for customers who intend to try the improved speed experience.
- The new tracking code is better due to the following reasons:
- It is independent of jQuery
- It natively supports SPA(single-page applications)
- Better experiments rendering as it does not poll but relies on modern browser API mutation observer
- Smaller footprint (about 20%)
- This script now has 2 options to block convert from running
- Pushing to queue using JavaScript with: window.conv_q.push({ what: 'disable' })
- Calling method: convert.disable()
🎯Note: The old projects and experiments will continue to use the Legacy Tracking Script. However newer features wont be available if you continue to use the legacy sciript.
Adding the query parameter: convert_disable=true
Other Tech Changes in the Tracking Script as opposed to the Legacy Tracking script
- It's not required anymore to call the run method at first component mount of SPAs, now we detect force changes on component hydration.
- The shape of convert.data has been changed to match the new API specs at https://api.convert.com/doc/serving/
- The shape of convert.currentData has been changed in case exiting JS code relies on it:
- convert.currentData.experiments > convert.currentData.experiences : and for each Experience:
- first_time > firstTime
- variation_id > use nested id in variation property
- variation_name > use the nested name in variation property
- variation_name_parts > use variation property
- convert.currentData.experiments_goals > convert.currentData.experiencesGoals
- convert.currentData.experiments > convert.currentData.experiences : and for each Experience:
- Some API methods have been renamed:
- triggerExperimentVariation > triggerExperienceVariation
- executeMissingDataExperiments > executeMissingDataExperiences
- checkExperiments > checkExperiences
- executeExperiment > executeExperience
- executeExperimentLooped > executeExperienceLooped
- All of the above exposed API methods must be pushed into Convert Queue _conv_q
- There's one new API method that can be called directly or pushed into the queue:
- convert.ready or _conv_q.push({ what: 'ready' }) > when rendering complete (returns a promise).
- Variation Custom JS is now invoked only once per session.
Improved variation deciding logic (now matching our JS SDK).
keywords: install convert implement implementation